How to create a storage
account using ARM template?
The easy steps guide.
Objective
The core
objective of this article is to get you introduced an ARM template with
step-by-step hands-on exercise. The basic introduction of ARM template has been
included intentionally to get a quick understanding and revision.
Brief introduction of ARM
template
·
Infrastructure
as Code (IaC) – configuration of resources in form of code to skip the
repetitive task and easily managed by Version Control
·
Declarative
syntax in JSON file format
·
Used
for automate deployment
·
Adopt
agile development method
Tools to create ARM
templates
·
Azure
Portal
·
Any
text editor like VS Code, Notepad++ etc.
·
Visual
Studio
Additional useful tips
·
VS
Code Extension for ARM
·
Readymade
templates available on Github and Microsoft Azure Documentation
Notice, I’m
using VS Code to create this example. Install Azure Resource Manager (ARM)
Tools extension before proceeding further. This is very useful extension
provided by Microsoft. Trust me, it will ease your life while creating ARM
templates.

Snapshot 1: ARM template extension by Microsoft
Ways of deployment of the
ARM templates
1. PowerShell
·
Install
AZ module using PowerShell. Please note: Az module commands will work on PowerShell version 6.0 and
above.
2. CloudShell
3. Azure Custom Deployment center
PowerShell and CloudShell are
almost similar so I’ll explain the deployment through PowerShell
in this article along with Azure deploy a custom template.
Format of ARM template
ARM
template is written in JavaScript Object Notation (JSON) and the initial template
has the following structure:

Snapshot 2: Basic ARM blank template
Explanation of template
elements:
“$schema”: is a mandatory element. It has
location of schema file. The version number could be different based on the
what editor you are using and the scope of the deployment. So, the highlighted
piece of information describes the version of schema version i.e. 2019-04-01.
Though
there are various other schemas available and you are free to use any one of
them but it also depends on deployment kind as mentioned earlier.
“contentVersion”: is a mandatory element. It is mainly used for
management of template version. You can pass any number sequence as per your
convenience following the given format.
“resources”: is a mandatory element. Any template meant to
be created for provision/update and deploying at least one resource. The
“resources” element receives an array of deployment resource(s) and their
supportive elements.
Rest other
elements are optional but very useful like “parameters”, “functions”, and
“variables”
“parameters”: the custom values passed for
deployment as parameters while executing the deployment script.
“variables”: the values are customized and used
within template JSON file. It is used for simplifying the template file.
“functions”: you can pass user-defined methods
within template file.
“output”: it holds the returned value after
deployment.
A template for deployment
[Example]
File
name: 'storagetemplate.json’
{
"$schema": "https://schema.management.azure.com/schemas/2019-04-01/deploymentTemplate.json#",
"contentVersion": "1.0.0.0",
"parameters": {
"deploymentPrefix": {
"type": "string",
"minLength": 3,
"maxLength": 8
},
"storageAccountType": {
"type": "string",
"defaultValue": "Standard_GRS",
"allowedValues": [
"Standard_LRS",
"Standard_GRS",
"Standard_ZRS",
"Premium_LRS"
],
"metadata": {
"description": "Storage Account type"
}
},
"location": {
"type": "string",
"defaultValue": "[resourceGroup().location]",
"metadata": {
"description": "Location for all resources."
}}
},
"variables": {
"uniqueSAName": "[concat(parameters('deploymentPrefix'),'-', uniqueString(resourceGroup().id))]"
},
"resources": [
{
"type": "Microsoft.Storage/storageAccounts",
"apiVersion": "2019-04-01",
"name": "[variables('uniqueSAName')]",
"location": "[parameters('location')]",
"tags":
{
"displayName": "demo-storageacc01"
}
,
"sku": {
"name": "[parameters('storageAccountType')]"
},
"kind": "StorageV2",
"properties": {}
}
],
"outputs": {
}
}
Code snippet: Example template
Before
deployment, let’s have a quick check through Azure portal.
·
Login
to Azure Portal
·
Navigate
to “Deploy a custom template”


Replace the above given template in the editor and immediately get the
following result

There are 3
Parameters, 1 Variable, and 1 Resource identified in the template, which is
correct and validated. Now the final step to deploy the above template. Which
would come after the explanation of Parameters and Variable below.
Parameter 1
|
 |
deploymentPrefix - for the environment name like
Dev, QA, Staging, UAT or Prod, where to deploy or update. I have used this
parameter in “variables” property within the current template.
|
Parameter 2
|
 |
storageAccountType – is combination of Performance +
Replication in the Azure portal.
allowedValues - restrict the users to choose
any option out of given values
defaultValue – if no value for storageAccountType
as parameter then the value given here would be accepted by default
metadata – it gives the (i) icon with a
tiny popup for the explanation for user’s understanding.
|
Parameter 3
|
 |
location – the region where to create the
storage account.
defaultValue – we are using the same location
as of resource group under which this account would be created.
metadata – it gives the (i) icon with a
tiny popup for the explanation for user’s understanding.
|
Variable 1
|
 |
Unique
|
Finally the
usage of parameters and variable will be used in “resources” element.

How to deploy the
template?
Using Azure Portal >> Custom
Deployment
Fill up the desired values in the given controls. Notice,
these are the same parameters which have been declared in the template. The
active subscription of your account will automatically get populated in Subscription
dropdown.
You are free to use any existing Resource group or Create
new here too. As per our template the Location dropdown will take the Resource
group id by default otherwise you can choose any valid location from the
dropdown.
Deployment Prefix will accept any string value minimum 3 but
maximum 8 characters value as per declared in the sample template in this
article.
Storage Account Type is prepopulated with the default value
as per template. You are free to use any allowed value at this stage.

Once you
are done with parameter values, tick the agreement and click the Purchase
button as given in above snapshot.
Using PowerShell
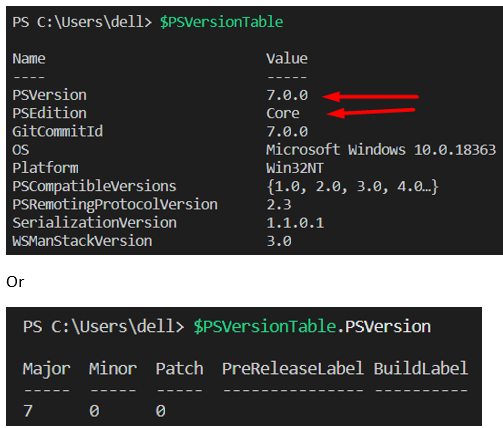
First just ensure, you are using the PowerShell version 6.0
or above. For this article, I’m using Powershell version 7.0
How to confirm the PowerShell version?
Now you are ready to deploy the custom ARM template
·
Connect to Azure first using following command
PS D:\ azure>
Connect-AzAccount
It would ask the Azure Portal credentials
first for validation and then would allow you to perform any operation through
command line.
·
Use the following command for deployment through
PowerShell
PS D:\ azure>
New-AzResourceGroupDeployment -Name 'demoforstorage' -ResourceGroupName
'demorg' -TemplateFile 'storagetemplate.json'
> New-AzResourceGroupDeployment is the PowerShell
command
> -Name parameter is given any name for the
deployment
> -ResourceGroupName is given an existing Resource
Group name which is ‘demorg’
> -TemplateFile is given the name of the template
I have created above in this article.
Just hit the “enter” button and wait for 30-40 seconds.
You’ll receive the output as Successful.
To cross-check, visit the Azure Portal > Resource Group
> demorg
Please notice, there are two types of Deployment names
mentioned in the below snapshot
1.
Microsoft.Template meaning I have deployed the
ARM template using Deploy a custom template in Azure Portal.
2.
Demoforstoage meaning I have deployed the ARM
template using PowerShell and given this name as parameter. Refer the
deployment command given above.

I’ll
discuss more detailed and relevant content regarding ARM template in another
article.
Thanks
Abhishek
Maitrey
Twitter:
@abhimaitrey


No comments:
Post a Comment